Thursday, January 22, 2009

Spring Dreaming, Winter Planning

It's amazing how the warm sunshine through a winter window or a simple spike in the outdoor temperature for a day can set our gears in motion. I can't say it's been a particularly bad winter here---the frigid temps have been annoying but the usual snow/sleet/ice hasn't fallen---and yet, I'm already hearing rumbles of cabin and/or spring fever. At my volunteer job yesterday, I had more than one inquiry about starting indoor vegetable seeds. I too am so eagerly looking forward to that day. January's almost gone, February is leap, soon it will be the first of March and time to drag the grow lights out of the basement (I don't have a greenhouse and our dining room faces the east but its our largest window and best source of natural light and the grow lamps supplement) and set up the dining room greenhouse.

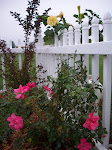
Until we can get outside and head down the garden path (thus the reason for today's picture), there are a few activities I do about this time of year to help beat the winter blues. In a nutshell, I start planning. Once spring arrives, I like to have a solid idea of what, where, when, and how I'm going to execute all my necessary tasks. For instance:

Vegetable Garden Layout

This is huge for me!!! Now more than ever, food pantries across this country are in crisis. Not only do I need to think about how much food my household is going to need but then I need to consider what I want to grow for the food pantry, when I want the first harvest to start, and where should I plant seedlings for maximum output.

1) Drawing up a tentative layout is essential.
a) I like to consult companion planting charts, which I'll talk about in a separate posting as we get closer to spring. There's a ton of information on companion planting on the web and it's worth sorting through and reading.
b) I rotate my tomatoes so they are the first plants I establish on my layout.
c) Once I have the tomatoes on the layout, I can work on row arrangements.

I can actually spend a number of hours on this activity alone.

Hanging baskets, urns, and planter design

I was extremely pleased with my floral arrangements in my hanging baskets, urns, and planters last season because I went to the nursery with a list of the materials and/or plants that I needed. I can get to the nursery and get terribly side tracked by how they've planted their containers, end up buying things I don't plan for and quite frankly, buy things I don't really want or need. It saves me not only time but a lot of money.

Soaker hose layout

Last fall I walked into Lowe's garden department and found 75 ft soaker hoses on sale for $1 each. I bought 40 of them. I definitely want a plan on how I'm going to string them through the garden beds for maximum coverage. They've been wound tightly in coils, so I'll need to stretch them out and let them lay in the sun for a few days to get the kinks out.

Collecting and Gathering

I saw a neat idea on the web wherein paper egg cartons were collected and then used as starter pots for seedlings. Innovative. I have started saving my plastic milk cartons which I use to protect my tomato seedling that first week out in the garden. It's a great time to begin buying seeds from catalogs. I even start stock piling fertilizer for my hanging baskets.

Pruning

One outdoor activity that is perfect for this time of year when the temps spike briefly is pruning. I love to inspect my trees and prune them while they are dormant. That activity also takes me past shrubs and rose bushes to inspect for winter damage.

Hopefully, spring will come early and April will be kinder than the two previous years. NO LATE FROSTS, please! And we'll be ready for it, armed with our best laid plans.

Wednesday, January 21, 2009

Hard Copy Garden Journal: A Fail-safe Way to Back Up One's Memory

Yesterday was certainly blustery here. Out my office window, the leaden clouds draped the sky and blotted out the sun for the biggest part of the day. It's nice to see the daylight break through today and the forecast high is for the 50's. Gotta love that!

Decided to catch up on a project yesterday that's long over due---and note, still not done---requiring lots of time and attention. Every year I put together a hard copy garden journal for my records. It starts early in the spring when I first begin buying/planting/building/sowing. From plant tags to blue prints to receipts, I save it all. I can't tell you how often its served as a clone of my own memory. Someone will ask me, "What's that plant called?", and if its something fairly obscure, I'm not likely to pull it from the depths of my middle-aged brain. So I sat down at the dining room table where I could really spread out the contents of the manila envelopes I'd collected and got busy.

I put my journal together in sections. I catalog all like things together, such as all perennial tags in one section for quick reference and that just happens to be what I was working on yesterday---perennials. Of course, I'm not likely to forget that the name of the coneflower in the above picture is Coconut Lime, which, by the way, just happens to be one of my favorite Echinaccea, but once its tag is secured in my hard copy journal, I also have a record of when it was planted. From Apricot Delight Yarrow to Veronica Fairytale and everything in between, I have a tag and it goes in my journal.

We were busy last season, especially with building all the new perennial beds but, until I sat down to put the journal in order, I guess I didn't realize how busy I was at planting. I have 101 different perennial tags alone. Considering the fact that I rarely buy just one of anything, the plants that went into the ground last season numbered in the hundreds. Wow! Of course I planted several variations of the same family. For instance, this tiny beauty at the right is Beaujolais Bonnets, Scabiosa Atropurpurea, (don't you love how the name Beaujolais Bonnets rolls off the tongue?!?) but I also planted its cousins, Pink Mist, Butterfly Blue, and Vivid Violet---all with their own distinct botanical names as well. There's no way I'm going to remember all that information and searching through books or online garden sites for that info is just too time consuming. My hard copy journal is a godsend. I alphabetize all the tags and its a snap to find what I'm looking for in a hurry.

I did manage to finish the perennial section yesterday afternoon. Now its on to rhizomes. I did manage to sort those tags and again I was amazed. According to the number I collected, I planted 32 different varieties of iris---7 pinks alone! And without going into the diningroom and conferring with the tags, I can't remember a name of a single one.


Beginner's tip: Other information that can be added to a hard copy journal is where in the garden a selection was planted, how it faired and grew, likes and dislikes, etc. It's time consuming but I think its worth it. Later in years, you'll have an entire index in the volumes of handwritten journals that could come in very handy if one was to say, sell their property and pass that info on to a new owner.

Monday, January 19, 2009

Zero-turn Mowers: Buying the Right Equipment for the Job


Four years ago, when we moved to our present property, Dave and I purchased a John Deere L130 lawn tractor. Going from a city lot where I pushed mowed our entire yard to 3.8 acres of ground, I knew we were going to need a riding lawn mower. Unfortunately, I didn't do enough research. Yes, the L130 could handle the amount of acreage that needed to be mowed but no, it didn't do it quickly or efficiently.

What I don't mow is taken up with house, barn, garden beds, septic pond and blackberry patch---(possibly the .8 I always tack on to be correct instead of just saying 4 acres.) The rest is grass that can easily get so thick, it was nearly impossible to get the L130 through without clogging up the mower deck. So then I'd have to get off the mower and clear the deck before I could proceed. What a pain!!!

Besides the clogging problem, I was literally working the tractor to death. During an average season of mowing, I could easily log 80+ hours. That's a lot of wear and tear on a lawn tractor. I was filling the gas tank twice as well, using all of both full tanks. At the price of gas, it was getting very expensive. Needless to say, it was wearing me down too. All the tight turns required stopping and backing and going forward so that I could get as close as possible to a target object, i.e., trees, utility box, shed, etc. I do all the mowing while Dave does all the weed eating. I assure you he has the worst of it and yet, fighting that lawn tractor for six hours a trek was taking its toll on my neck, arms, and back.


My neighbors, who'd all been mowing their properties a bit longer than me, used zero-turn mowers. They would get on their mowers long after I had started and were finished long before I was done. After two seasons of mowing with the lawn tractor, I decided it was time to reevaluate my equipment needs. This posting is not to advocate for one brand of tractor over another. Mr. Smith, my neighbor to the northeast, just bought a brand new Kubota last spring and really likes it but, I can't talk about it because I have no experience with it. So, I'll tell you what I do know.

Why did I choose the John Deere brand? Simple:

1. My husband's grandfather swore by his John Deere farm equipment.

2. The John Deere dealer is 6 miles from our house.

3. The performance of the lawn tractor impressed me enough to want a zero turn of the same
kind.

My rule of thumb for everything is: Compare all brands for manufacturing and features. I love my 757 but it does have a couple things I'd change. For overall performance I'm still impressed.

So what did I get?

1.Speed/Efficiency
My mower runs up to 9.5 mph. It's not only fast but its fun---kinda like riding on a go-cart while doing my work. Moreover, it's taken my mowing time from six hours a week to two and a half hours. Less time on the mower, more time in the garden!

Fuel wise, I'm filling the tank once and one tank will last two mowings. Yes the tank is bigger so I'm probably saving roughly a couple gallons each week. When gas was $4 a gallon, that was nothing to sneeze at.

2. Manufacturing/Construction
The 757 has a rugged, 300 pound steel cutting deck. The mower is commercial grade. I can sit and spin in place (dig a hole in the ground) because of its hydraulic capabilities which make mowing around objects a snap. It's tough. I hope its the last mower I'll ever have to buy.

3. Power
I am able to mow down the toughest grass situations without worrying about the cutting deck clogging up.

I'm sure John Deere would say I didn't quote exact specs as good as they might have liked me to but, I know what's important to me and all that other jazz can be found on their website!

As for the L130? Still a great lawn tractor. And it still gets its share of the work. We bought a small wagon for it to haul around for moving dirt, mulch, gravel, etc. It's not sitting in the barn collecting dust . . .

Sepia Tones Blur the Harsh of Winter on the Gardens

I've made it really plain how much I don't like winter. So, when invited to submit photos for a contest entitled Winter Wonders Photo Contest with the theme being: What I love about the winter garden, I found it extremely hard to be positive about something that's always been a negative for me. I went to the site to research the contest rules and see what other contributors had submitted and I found something extraordinary there. It wasn't the winter in the winter garden people loved but the state of the garden enduring winter. I have to say, I understand that.

I applaud my garden's ability to withstand elements that would cause me to perish if I were exposed to winter as my garden is. So far this year, our losses have been minimal. We have a river birch out in front of the house. It was a three-trunk tree until one of the trunks froze, split, and broke away from the mother clump. This once lovely tripod is now an adequate biped. I have little room for complaining though when this winter has been so harsh and has done so much damage in so many places.

The above picture has been altered by filters as were my submissions. Blur the harsh realities of cold by applying the romantic tones of sepia to the winter part of the winter garden and I find it somehow more acceptable. About the garden itself during this time of year? I admire its tenacity to withstand the worst of elemental punishment with the ethereal grace of patience.

Kohlrabi: The Layerless Cabbage


Kohlrabi (cole-rah-bee), like all other cole crops, developed from the wild cabbage, Brasscia Oleracea. This particular vegetable was introduced to the United States in the very early 1800's. It's name is derived from kohl meaning cabbage and rabi meaning turnip, thus being termed the turnip cabbage. Most often thought of as a root vegetable and/or a bulb, it is neither. The kohlrabi is merely the swollen part of the stem that forms just above the ground. I'm not a botanist so that's as far as I go in trying to inform on this vegetable. To say the least, it is by far the most unique of the cole crops.

What I know about this vegetable from firsthand experience: It will grow in a relatively small amount of space. In early June, I'd run to Sutherlands for something---possibly (probably) mulch---and I noticed at least a dozen long trays of this leafy seedling sitting off to the side of one rack being ignored. If two four packs had been purchased by another that might have been an over estimate. Quite simply, most people didn't know what it was and weren't buying. I always end up with a spot here and a spot there in my vegetable garden that is bare. Usually I plant herbs in those spots but last year, after a pang of sympathy for the abandoned seedlings, I purchased 6 four packs of kohlrabi and took them home and planted them. And yes, my sympathy pangs were more plentiful than the bare spots in my garden. That's okay, I just crowded them in. I wasn't sure they'd do anything, being a cole crop planted in midsummer. Not only did they grow, they prospered. If you don't eat a lot of cabbage, buy a four pack and call it good. This little veggie is remarkably productive.

Within a month of planting, they were ready for harvest. (Kohlrabi should be harvested when it is around three inches in circumference or it tends to get tough. I let them get about as big as my fist.) So what to do with them? They are just as versatile as the cabbage. Eaten raw, most people choose a side and say they either taste like a cabbage or a turnip. They have the solid structure of the turnip with a slightly more cabbage-like taste in my opinion, thus why I subtitled this posting the layerless cabbage. Another real plus for any vegetable is the quantity of storage time. Again, the kohlrabi is remarkably hardy and long lasting when properly refrigerated.

I know that every time I took some to the food pantry for donation, I was told later the kohlrabi were the first vegetables to go. Once people try them, they love them. Nutritionally speaking, the kohlrabi is low in sodium and (hoorah!!!) low in calories while being a great source of Vitamin C and Potassium.

FYI: The kohlrabi can be eaten raw but is equally good steamed, stir fried, boiled (as a vegetable added to soup) and grated (as for slaw). Cut into one inch cubes and properly blanched it can also be frozen and then used later in soups and stews.

Thursday, January 8, 2009

Too Common

Yesterday I received a garden magazine in the mail and on the front cover was a picture of a pristinus ebur zinnia. (No, Latin is not a second language for me. I just felt that calling it a pristine ivory zinnia didn't heighten its descriptive appeal all that much.) Anyway, one thought led to another and soon I was recalling a moment this past summer while I was at Lowe's garden department looking for filler annuals for bare spots in my perennial beds. A woman was shopping with her daughter, a child of about 5 years old, and the little girl was enthralled with a display of marigolds. Those bright orange and yellow hues really had a hold on her attention. I could easily relate. Marigolds are always a favorite standby in my own mother's flower beds. It was all quite a nice memory for me and then the child asked her mother to purchase those marigolds. I really was taken back by the woman's negative answer. It would seem that marigolds weren't good enough for this woman's garden because they were too common.

I must say the reason I relate this particular memory is because as soon as I saw the zinnia on the front cover of my magazine, the first thought that popped into my head was, I'm surprised they chose such a common flower. Oh I know---bad garden fairies will probably rain down on me!!!

So what is common? Isn't it that that is not distinguishable from the ordinary?

Some of the most distinguishable annuals in my 2008 garden beds were my tall zinnia. They ranged in color from a white so pale it almost appeared lime green to the brightest, deepest scarlet pinks, and everything in between. I was also blessed with a wide variety of structural shapes: star, pompon, and rosette just to name a few. When the perennials had given up either due to spent blooming time or just plain ragged Midwestern heat, the zinnia became the crowning glory along with other old favorites like begonia, vinca, cosmos and salvia. It's the annual that is the workhorse of the garden, blooming an entire season until the first vestige of a mean spirited frost puts them forever to sleep.

Beginner's tip: Almost all annuals produce easy-to-reap seeds that can be planted the following spring. Zinnia, cosmos, and marigolds are especially good choices for seed collection. Often the marigold will self-sow. Another really good annual that grows well year after year in my garden is Victoria Blue salvia. In fact, I planted it on the south side of my house (remember I'm zone 5) and it comes back like a perennial.

Tuesday, January 6, 2009

Suncast Gazebo

Happy 2009, everyone! Now that the new year has found us once again, it's time to start thinking about the coming spring. I always have at least one new project brewing in my head by this time, if not a half a dozen! With the holidays out of the way, I'm ready to rush full steam ahead with the planning. This year, I need to research the exact design I want for my new potting shed. Don't know if it will happen because of the economy and having to tighten our belts but it doesn't hurt to be prepared (or dream). Hopefully, I'll be able to share the capers of its fruitation at a later date. But for now, let me tell you about last spring's project.

I've always wanted a gazebo. I remember New York vacations at my grandparents' house, whiling away the heat (their idea of heat anyway---I'm a Midwesterner, please!) of summer in their shaded gazebo. My grandfather had a family of chipmunks that came visiting on a regular basis to rifle his pockets for peanuts. Good memories.

Every year we talked about building a gazebo but unfortunately for me, my husband's occupation involves industrial construction and spring is just when those huge projects are gearing up as well. That's why I began to consider kits for time and convenience. Wow! I had no idea how much was out there and how much was available. So here's my first tip: Know what you need/want. My needs were simple. All I wanted was a structure to 1) compliment the west side of my courtyard and 2) allow enough room for Dave and I to sit comfortably and enjoy the evenings together.

My second tip: know what amount of maintenance you are willing to provide over the life of the gazebo. Quite frankly, we wanted very little if any maintenance at all. Those wooden gingerbread laden gazebos are fantastic to look at but we didn't want the time consuming job of yearly staining or painting. That's why I chose the Suncast Gazebo. It's rigid resin construction will not splinter or rot.

And lastly, my third tip: know the amount of skill level required for assembly. I am not a carpenter and my husband didn't have much time for building. We needed a fast, easy solution. The Suncast Gazebo required only a platform for anchoring. David was able to build that in a day.

So, after all my research, I ordered my gazebo and this is how it arrived at my doorstep:


(This is a freight-only item because of it's sheer size---two large pallets long---and weight. The trucking company will ask if a dock is available or if they need to send it on a lift gate truck.)


Although David assembled 90% of the gazebo without my help, it really works better with an extra set of hands. The rails can be tricky but otherwise, it's a peach to put together. I believe anyone could assemble this gazebo in one day. The finished measurements are 10'X10' and it easily holds a table and four chairs. However, many people have told us that they think it's an ideal structure to place over a hot tub! I would concur it weren't for the fact that we meant it as a stopping place, either at the end of our courtyard or as a spot to rest before moving on to the koi/goldfish pond. We spent many a fine summer evening sitting under it, watching the sunset. I believe the Suncast website shows the gazebo anchored to a flat, square platform resting atop the ground. We chose to raise our platform to give the gazebo a bit more height and David designed the platform to follow the same octagonal shape as the gazebo itself. We also left off one set of rails so that we could enter and exit from more than one side instead of enclosing the inside circle.


We finished the platform by closing it in and then added flower beds and a gravel path around it. I cannot tell you how many compliments we've received. The manufacturing quality is such that it looks just as great up close as it does from a distance. A top notch product.

At Christmas, we outlined the gazebo in twinkle lights and it was really something to see at night.

So, if you are into planning your winter projects early like I am and you choose to make the Suncast gazebo your project of choice, I'd like to hear about it. Feel free to email me at:

GardenGenn@msn.com

I'd be happy to respond to any questions you might have.

Van Bourgondien August 2008 Garden Contest Winner

Come take a peek at my pictures which won the August contest and and while you are at the Dutch Bulb website, view winners of other months as well.