Tuesday, March 31, 2009

Compost 101: Starting a Bin from Scratch


Spring is the best time of year to start a new compost bin. The grass is just starting to turn green and will soon need mowed. The flower and garden beds are waiting to have all the dry material that overwintered cleared away. Super. Two out of three starting materials are right at your finger tips: green (grass) and gold (dry materials). Now all that is needed is the third material, brown (topsoil), and you're ready to begin.

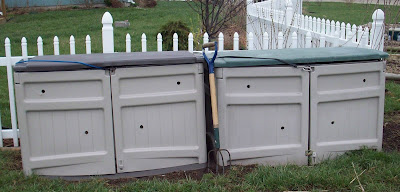
Above are the type of compost bins I use. They are actually Suncast storage bins that I have converted by drilling ventilation holes in the sides. More elaborate compost bins are starting to show up at retail venues. Do I even think a container is necessary? Nope. You can compost right on top of the ground in a controlled heap. I personally like using a container so that I can control the amount of moisture in the compost. Here are a couple other ideas for converting everyday objects into compost containers or bins:

Plastic trash cans
Pallets nailed together to form a cube
Chicken wire and four posts to form a cube

Use your imagination. Just remember that the compost needs to be stirred or turned on a regular basis and ventilated. Okay. So now you have your container and are ready to begin assembling your compost pile. It goes like this: brown, gold, green. Easy!

1. The first layer in the bottom of the container should be dirt. When I started my first compost bin from scratch, I used regular top soil which can easily be purchased in bags from garden departments. The dirt should be between six and 12 inches deep in the bottom of the container.

2. Now throw in those dried flower stalks. Straw is also a good gold starting material. Just remember to not use woody material that doesn't break down easily. If in doubt, shred before adding to the bin. Later in the season, dried grass from mowing is an excellent form of "gold".

3. Now top that off with a healthy layer of green. Early in the spring, mowed grass is the most voluminous "green" on hand. Green is the water component of the compost bin. Later in the season, I use plant material that I've trimmed from my flowers or vegetable matter from my garden beds.

One layer of each is sufficient to start but if your container will hold another layering, go for it. Okay, now that the layers are complete in the bin or container, leave it alone for two solid weeks. At the end of fourteen days, stir, stir, stir. You should be able to see a marginal breaking down of the three layers. Stirring will further that decomposition.

Now that your compost has been born, it takes fuel to keep it going. Additions of high-carbon matter (gold) such as straw, dead leaves, dry grass and high-nitrogen matter (green) such as grass clippings, vegetable peelings, and used tea bags fuel the decomposition.

Do use:
grass clippings
nutshells
vegetable matter
eggshells
coffee grounds/filters
tea bags
weeds
leaves
straw
sawdust
bark
shredded newspaper
old potting soil

Don't use:
meat
dairy
diseased plants
manure

Turn the compost once a week with a turning fork. It is essential for the compost to get enough oxygen, thus the ventilation holes in plastic containers. A foul smelling compost is rotting not composting. A thorough weekly turning is essential to provide oxygen to the layers. The compost should smell fresh and sweet. If a foul odor persists, the compost is too wet. Add more gold! If the compost is too dry, it won't break down. Add more green. Soon, your bin will be filled with rich organic material ready to be added to flower and garden beds.
Monday, March 30, 2009

Robins in my back yard, Weather, and Florida Sweetheart Caladiums at Sam's Club

For the past week, I've been watching a pair of robins build a nest in the bare branches of wisteria winding around my back yard arbor. I'm not a bird watcher and don't know the slightest thing about robins other than what I've observed over the years. And I don't usually let birds build nests in that particular arbor for sanitary reasons, but, these robins are such a charming couple, I could not bring myself to disturb them. Furthermore, they've not been daunted by Lu, so I guess they know what they are doing. I'm a bit concerned about the fate of the babies if one should fall out of the nest. Lu has a penchant for between meal snacking. I guess this is also a test run for allowing future nest building in this particular spot. This arbor is over an essential walkway. We'll see how it all turns out.

I had to wonder though, where did this pair of robins find shelter this past weekend? I know for sure they weren't sitting on the nest when ice and sleet pelted every square inch of the arbor. What a nasty mess we had last Saturday! The temps dropped to right above freezing which allowed the rain we were getting to become frozen on stationary objects. And that was just the beginning. The weather went from sleet to ice to snow to balmy and tropical within 24 hours.

At one point, my big buttery daffodils went from bouncing in the wind to being stuck to the ground in a coat of ice. Unbelievably, they are back to bouncing in the wind again. I would have thought they would have turned to mush. In fact, I went out and looked around at some of my perennials, shrubs, and trees that are in various stages of growth, and I don't see damage yet. I haven't been to the vegetable garden to check on the red onions and kohlrabi. I did notice, as we wandered out on Sunday, that some Bradford pears were broken down.

Speaking of wandering out yesterday, I happened upon a huge surprise in the seasonal aisle of Sam's Club. There I was, walking along, looking at all the great new urns and planters, when I noticed a display containing box gardens---a box with both bulbs and bare root plants with like sun/water requirements. There were two or three full sun box gardens but only one for shade. It was the shade box garden that caught my eye. (Luckily, no one was maimed as I went from 0to 60, hurtling through the aisle toward the display.)

I subscribe to gardening magazines which I pour over through the winter months. I'm always anxious to read articles about new and improved varieties of my old favorites. One particular article about sun tolerant caladiums really got my attention. I have two urns on my back deck that get full sun for about two hours a day and then are plunged into the shade again. Still, for most caladiums, those two hours are two too many. I so wanted to plant those urns with caladiums and sweet potato vine. And, here was this article, telling me that a caladium called Florida Sweetheart was the answer to all my problems.

About the first of March, as I began to visit my local nurseries, I began watching for Florida Sweetheart to make an appearance in the spring bulb sections. I checked over the past four weeks and although lots of new bulbs were stocked, Florida Sweetheart was not one of them. Bummer. I was so disappointed. My search online resulted in finding bulbs that were expensive, some as much as five dollars a piece and that didn't include shipping. So, back at Sam's---I grab the shade garden box off the shelf and lo and behold---Florida Sweetheart Caladiums!

Here's the best part: in the box were four different types of shade plants. There were three Leatherwood Fern bare roots, three Christmas Tree Hosta bare roots, 6 Oxalis Triangularis bulbs, and eighteen---yipppeeee!!!---Florida Sweetheart caladiums for the whopping price of $19.95.

(Pictured at the right is an Oxalis Triangularis (purple shamrock) I paid $5 for last spring.)

Broken down, all the plants in the box garden cost roughly .67 cents each. I always try to support my local nurseries but I couldn't pass up this terrific bargain. I thought I'd pass the information along to you as well.
Note: Another sun tolerant caladium, Carolyn Wharton, can be found at Walmart in the garden department in the bulb section. Although new varieties of caladium claim sun tolerance, I would not plant in a place that receives 4+ hours of full sun a day.

Friday, March 27, 2009

Midwest Climatic Normalcy or Global Climate Change?

I'm feeling particularly querulous today as I watch the needle on the thermometer outside my office window drop to 30 degrees. It's times like this that I wish the world would have taken the issue of global climate change more seriously years ago. If so, it's quite possible the new spring foliage now would not be under assault from a threatening winter storm and I would not have to grieve for plants that I know aren't going to make a come back once this cold snap has passed.

Yesterday I went out and surveyed the prospects. The nectarines and nanking cherries are in full bloom. Good bye sweetness. Luckily the rest of the orchard is not so far along. One of our peach trees is partially flowering but isn't in full bloom and we have apples and other cherries that are only just beginning to form buds. Hopefully it won't be a total loss.

I'm also aghast at losing lots of new and tender perennials that didn't realize the trick being played upon them when they ventured toward the sun too soon. From same past experience two years ago, I can expect heavy casualties. Only the very hardiest will survive this brutal a beating---possibly a foot of snow and night temps in the 20's. In the past I would be running around like a crazy woman with mulch and quilt batting, trying to cover as much of the new growth as possible. I just don't have it in me this year.

Maybe its age, but I find I am less tolerant of stupidity as I get older. For instance, last weekend I was in a local nursery and I heard one woman correct another on the pronunciation of the word peony. Pronouncing the word pee-un-ee or pee-o-nee, in the whole scheme of things, what does it really matter? I have both northern and southern roots. For the most part, I find its a northern/southern difference. My northern family members pronounce the flower with the former pronunciation and my southern family members call a peony by the latter pronunication. Who's right?

Who cares?

When I hear someone going out of their way to point out that clematis should be pronounced clem-uh-tis instead of cle-mat-is or vice versa, it simply sounds like an uppity snob thing to me, northerner or southerner. That's as pathetic as which side of the global climate change issue one supports based on one's political affiliation. Please!

I remember 30+ years of Midwest winters vividly. Just a few years ago, March was part of winter and April was always on the fence. A Midwestern gardener didn't expect to start planting until the middle of April because that's when the ground was thawed enough to till. Okay, maybe that's an exaggeration, but I've been gardening long enough to know a change when I see it. Ten years ago, I didn't have to worry about April coming before March on the calendar.

Monday, March 23, 2009

A Kansas City Spring (2009)

I've been a bit indisposed for a couple of weeks as I wrangled with some health issues but I'm back and looking forward to an early spring---apprehensively. I'm well aware that all these lovely warm temperatures and balmy days, which have tricked all my perennials to emerge from the ground, could disappear in a matter of minutes. Let's hope its just the beginning of a perfect early spring.


So what's happening? I spent most of the morning transplanting eggplant seedlings. I started them in the one inch peat trays first and now they are in three inch peat pots. The next transplanting will be from the indoors to the garden beds. I have some lovely tomato plants in various stages of growth. This year, besides the pink girls that are my old stand by and favorite tomato, I've got pink oxheart, yellow jubliee, and amana orange growing. I'm anxious to see how these do. My grandmother used to grow a gorgeous yellow tomato the size of a beefsteak but unfortunately, I didn't get the name. If anyone knows what a tomato of that description might be called, please email me!

The star magnolia are in full bloom around the city. The top picture is of the star magnolia I have in my own yard. It's just a baby, no more than two feet tall but it bloomed so lovely this spring. Of course the forsythia add their sunshine yellow flowers to the mix. Here in the Midwest, it's the forsythia and the daffodils that tell us spring has sprung! Down in our orchard, the nanking cherries and the nectarines have blossomed. It won't be long before the other magnolia---Susan, Jane, etc., will be popping. Both my Susan and Jane are unfurling from soft gray buds into deep purple/pink blossoms. The peonies are beginning to show now as well.

But, its also a time when we'd love to start planting those tender annuals. To quell that urge until I'm a bit more positive the weather will stay warm, I indulge in shopping for new gardening paraphernalia. Last weekend, David and I spent some time in our local garden stores. It's a blast to see what new and innovative things are on the market each spring. I found a lovely hummingbird feeder and a couple of urns for my front porch.

Interesting enough, at one place I found allium bulbs that had not sold last fall. I'm not certain if these bulbs experienced any real cold so as to be overwintered but they were starting to grow and I just couldn't leave them to rot. I planted 25 bulbs in among my boxwoods around the front sidewalk. If they grow, they'll be a spectacular sight.

And last but not least, my ornamental sweet potato vines are starting to take off. They can be very slow so be patient. Mine have been planted for three weeks and yet every day a new start emerges. So far I have seven Marguerite, six Ace of spades, and one Blackie. Another plant that has done very well is the oxalis I brought in last fall. Wow is it growing! I can hardly wait to drag out all the hanging baskets and the planters.

Tuesday, March 3, 2009

Off to a Good start with the Basics


About 85% of the information found on this blog is written with beginning gardeners in mind. The other 15% of the content is purely anecdotal. Why? Because some times it's just fun to share things I find amusing or interesting or even infuriating. This particular posting is the result of a simple question I've been asked a fair amount lately, over a short period of time:


What did I do wrong?

This particular question is then followed with anecdotal information of the questioner's own, often stating a certain problem and the outcome. The garden season is just around the corner and new gardeners do not want to have a repeat of poorly performing vegetable plants. It's no fun to garden if the garden doesn't produce. Period.

A good harvest begins with the basics: Soil, Water, Fertilizer, & Air

Soil

I don't pretend to know a thing about soil in Utah or Maine or Kentucky. Don't ask me. However, do ask me about southeastern Kansas and northwestern Missouri. I've gardened extensively in both areas. Here are a few questions to ask yourself when determing your soil type:

1) Does the soil become sticky when its wet and form hard, rock-like clods when its dry?

2) Are dandelions, chicory, sorrel, and thistle the first greenery to grow after the soil is tilled?

3) After a good rain, do water puddles remain on the soils surface?
If answering yes to these questions, that's the first elemental part of solving the problem in what went wrong. Clay. Clay soil is a burden. It often discourages first time gardeners from every trying again because its nearly impossible to work, only the hardiest of plants will grow in it, and it is so lacking in fundamental nutrients that what does grow is often deficient in quality. What to do ?I have two solutions but one depends on your timetable.

If you aren't in a big hurry for expedient results, you can amend the clay. The quickest possible way to amend clay soil is to mix it with compost. You can create your own compost or it can be purchased from a garden center. I bought a trailer load of compost last spring for about $30. Also check with city recycling centers that accept lawn and garden debris. That debris is worked into compost and is often given away for free or for a very nominal fee. Gypsum (calcium sulfate) is an excellent conditioner for clay soil. It can be added at 20 pounds per 100 square feet of garden bed. Peat moss is also a great additive which helps the soil retain air. In the fall, till rotted manure and chopped leaves into the soil before the garden goes to sleep for the winter.


No time for that process? Buy good top soil from a garden center and replace the clay. Even at that, I still add compost, gypsum, and peat---just not as much. The soil is the foundation, the most fundamental element in which everything depends.

Water
I've heard many a gardener brag: I don't have to water my garden. That is pure crap. Unless weather conditions are perfect the whole growing season long, everyone waters. Buy good equipment the first time. I prefer four-ply, rubber reinforced mesh hoses equipped with heavy duty brass couplings. They last and last. I scatter hose guides throughout the garden so that the hose glides along the guide instead of falling on and crushing my plants. Osciallating sprinklers can cover a large area but up to 25% of the water may evaporate before reaching the soil. Personally, I'd love to have a low-volume irrigation system but I'm not rich. I've settled for soaker hoses. Made of canvas, they seep water along the entire length of the hose, wetting the soil 2 feet on either side. They are great for vegetable gardens but I also install them in my flower beds. Water deeply but infrequently. This forces the plant to develop deep roots. The only deviation from this: keep seedlings moist. It's doesn't do to let them dry out. Use mulch or straw to retain moisture until the plant can fend on its own.

Fertilizer
Let's face it, do you know of a harder worker than a vegetable plant? Most are transplanted into the garden when they are but a few tender weeks old, quickly they generate doubling their beginning size over and over, and they produce offspring in hoards if well tended. No matter how good the soil and water conditions are, the plant can use a little something to eat now and then! Last year I had 32 tomato plants that produced 1800 + good tomatoes. That's not counting the ones insects or birds destroyed. Yes, I fertilize them. I prefer a granular pellet that I can either top dress (sprinkle on at the surface) or broadcast (throw from a hand held spreader).
Let's talk about principal nutrients or the big three: nitrogen, phosphorus, and potassium.


Nitrogen (N) promotes healthy, abundant foliage.
Phosphorus (P) stimulates root growth and aids in plant maturation
Potassium (K) promotes healthy, abundant flowers and fruits


Look on the back of the fertilizer package to determine the amount of these nutrients. I think that the ratio of each element should be equivalent to the total mass, for instance 10-10-10, for heavy growers like supertunias. In the garden, I first feed with a granular that promotes heavy growth in foliage, 10-2-6, until the plant begins to flower and then I back off because too much nitrogen can inhibit flowering and in order to get vegetables, the plants must flower. I then use a fertilizer heavier in phosphorus and potassium to set and develop the crop.


Organic fertilizers are derived from animal or plant matter as in bonemeal and manure. I don't fool with these once the plants are in the ground because they can wreak havoc. They contain so much nitrogen that plants literally burn up.

Air

Believe it or not, the success of the garden also depends on air and/or the circulation thereof. All plants need air to stay healthy. Air works to dry out garden beds so that plants don't stand in swampy soil. This eliminates the production of fungus or mildew. Give plants their space. Know how large around a plant will get and plant accordingly. Air should flow freely between plants and circulate above and beneath foliage.

The other factor of air is its ability to infiltrate soil so that the soil doesn't compact and stunt roots. The freer the roots are to spread and travel, the healthier the plant. About once a month, I check all my vegetable plants to see how easily the soil moves under the foliage. If compacted, I use a turning fork to gently loosen the soil. I carefully puncture the dirt around the drip line (a circle around the plant where the heaviest roots have yet to grow) and gently turn the fork back and forth.

If you can master those four basic garden elements, you'll seldom ask the question What did I do wrong and instead will replace it with Wow, look what I did right! Another invaluable resource is to make friends with an experienced gardener who doesn't mind answering questions. In fact, if you live in my area and have gardening dilemmas, feel free to email me. There's nothing I like better than to talk garden!