Spring is the best time of year to start a new compost bin. The grass is just starting to turn green and will soon need mowed. The flower and garden beds are waiting to have all the dry material that overwintered cleared away. Super. Two out of three starting materials are right at your finger tips: green (grass) and gold (dry materials). Now all that is needed is the third material, brown (topsoil), and you're ready to begin.
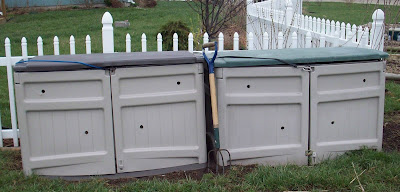
Above are the type of compost bins I use. They are actually Suncast storage bins that I have converted by drilling ventilation holes in the sides. More elaborate compost bins are starting to show up at retail venues. Do I even think a container is necessary? Nope. You can compost right on top of the ground in a controlled heap. I personally like using a container so that I can control the amount of moisture in the compost. Here are a couple other ideas for converting everyday objects into compost containers or bins:
Plastic trash cans
Pallets nailed together to form a cube
Chicken wire and four posts to form a cube
Use your imagination. Just remember that the compost needs to be stirred or turned on a regular basis and ventilated. Okay. So now you have your container and are ready to begin assembling your compost pile. It goes like this: brown, gold, green. Easy!
1. The first layer in the bottom of the container should be dirt. When I started my first compost bin from scratch, I used regular top soil which can easily be purchased in bags from garden departments. The dirt should be between six and 12 inches deep in the bottom of the container.
2. Now throw in those dried flower stalks. Straw is also a good gold starting material. Just remember to not use woody material that doesn't break down easily. If in doubt, shred before adding to the bin. Later in the season, dried grass from mowing is an excellent form of "gold".
3. Now top that off with a healthy layer of green. Early in the spring, mowed grass is the most voluminous "green" on hand. Green is the water component of the compost bin. Later in the season, I use plant material that I've trimmed from my flowers or vegetable matter from my garden beds.
One layer of each is sufficient to start but if your container will hold another layering, go for it. Okay, now that the layers are complete in the bin or container, leave it alone for two solid weeks. At the end of fourteen days, stir, stir, stir. You should be able to see a marginal breaking down of the three layers. Stirring will further that decomposition.
Now that your compost has been born, it takes fuel to keep it going. Additions of high-carbon matter (gold) such as straw, dead leaves, dry grass and high-nitrogen matter (green) such as grass clippings, vegetable peelings, and used tea bags fuel the decomposition.
Do use:
grass clippings
nutshells
vegetable matter
eggshells
coffee grounds/filters
tea bags
weeds
leaves
straw
sawdust
bark
shredded newspaper
old potting soil
Don't use:
meat
dairy
diseased plants
manure
Turn the compost once a week with a turning fork. It is essential for the compost to get enough oxygen, thus the ventilation holes in plastic containers. A foul smelling compost is rotting not composting. A thorough weekly turning is essential to provide oxygen to the layers. The compost should smell fresh and sweet. If a foul odor persists, the compost is too wet. Add more gold! If the compost is too dry, it won't break down. Add more green. Soon, your bin will be filled with rich organic material ready to be added to flower and garden beds.


